

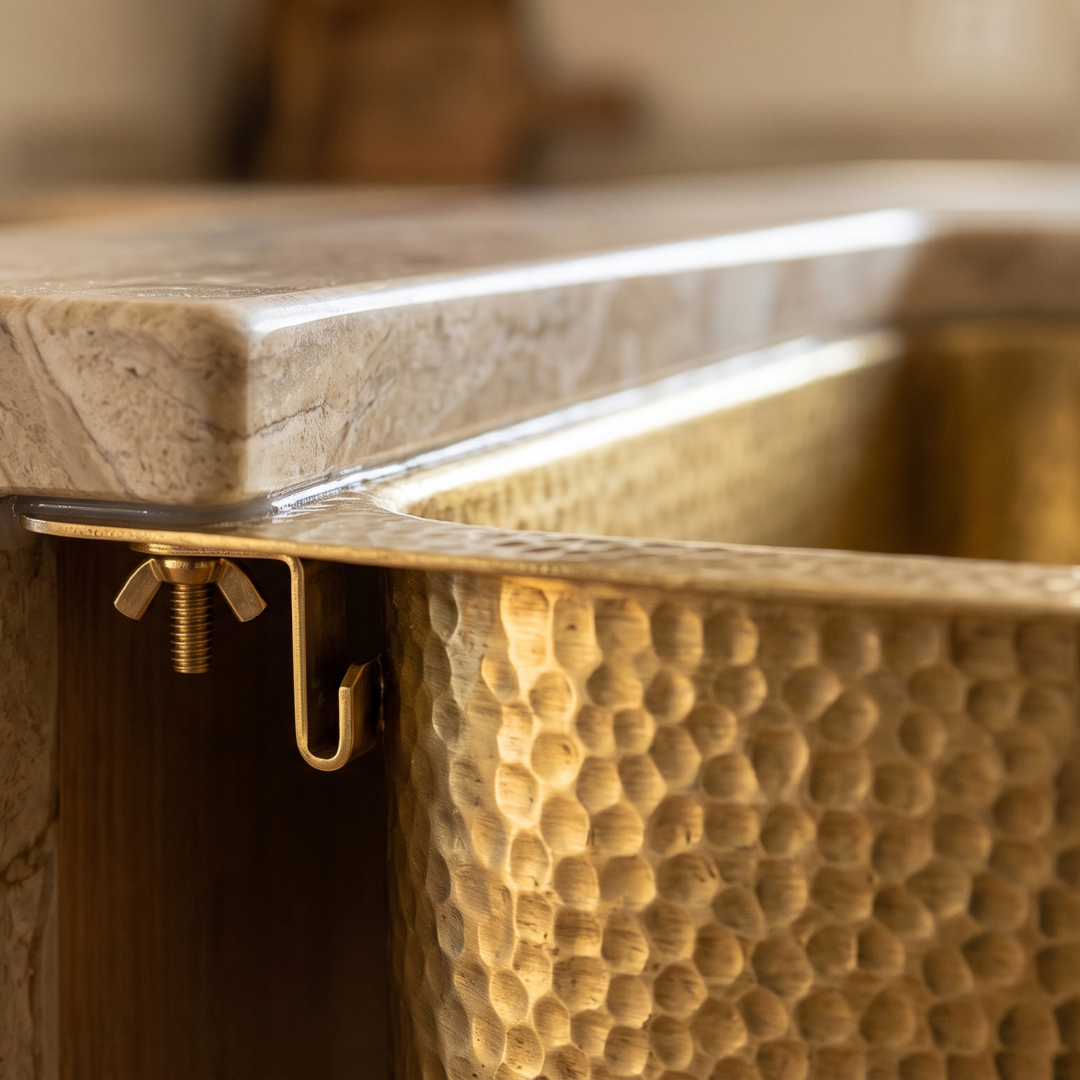

The clip and epoxy anchor that do the real work of holding an undermount sink in place, out of sight beneath the counter.
Undermount sink clips are small metal brackets, usually paired with an epoxied stud or screw, that hold a sink flange tight against the underside of a countertop from below. They’re mounted every 8 to 12 inches around the rim, bonded or screwed depending on the countertop material, and paired with a silicone bead at the visible reveal seam. Installation typically takes under an hour of hands-on work, plus 24 to 48 hours for the epoxy to cure before the sink can be used.
An undermount sink has no rim resting on top of the counter, which is exactly what gives it that clean, wipe-everything-into-the-bowl look. It also means the sink is entirely dependent on what’s holding it from below. That job falls to a small ring of clips, sometimes called sink brackets, working alongside epoxy or screws and a bead of silicone at the seam.
This guide covers what these clips actually are, how they compare to epoxy-only mounting and other bracket styles, how the right approach changes by countertop material, and the step-by-step process for installing them without cracking a slab or letting water into the counter’s most vulnerable point.
- Clips hold the sink flange against the countertop underside, spaced every 8 to 12 inches around the rim.
- Stone and quartz counters typically use epoxy-bonded studs or clips; wood and butcher block use screws instead, since epoxy doesn’t hold well in wood.
- A silicone bead at the visible reveal seam is a separate step from the clips, it seals the joint rather than bearing weight.
- Heavier sinks, including solid brass or copper, generally need more clips spaced closer together than a standard stainless sink of the same size.
- The epoxy needs 24 to 48 hours to reach full cure before the sink should carry any real weight.
What undermount sink clips are
An undermount sink clip is a small metal bracket, usually a stamped Z-shape or a two-piece stud-and-bracket assembly, that anchors to the underside of a countertop and pulls the sink’s flange tight against it. Because the flange sits below the counter’s surface rather than resting on top of it, the sink has no other support holding it up besides these clips, the bonding method, and the cabinet below acting as a backstop rather than a load path.

A simplified cross-section. Exact hardware varies by clip system and countertop material.
Most clip kits pair a threaded stud, bonded into the countertop’s underside with epoxy, with a bracket that hooks under the sink’s rim and tightens with a nut. On stone and engineered quartz, the stud is epoxied directly into the slab. On wood or laminate, a flat clip is screwed in instead, since epoxy doesn’t form a reliable long-term bond with wood. Either way, the clip’s job is purely mechanical, holding the sink up and pressing the flange flat against the counter, while a separate bead of silicone at the visible seam handles the actual waterproofing.
This matters for anyone considering a solid brass or copper undermount sink in particular. These sinks run noticeably heavier than stainless steel of the same footprint, so the clip count, spacing, and hardware rating all need to account for that extra weight rather than defaulting to whatever ships with a standard kit.

The Finished Result
No hardware, no visible seam
When the clips, epoxy, and silicone bead are all done correctly, none of it shows. The sink sits flush with the countertop, the reveal edge reads as one continuous surface, and the only sign of the mounting hardware is the clean line where metal meets stone or wood.
Clips vs epoxy vs brackets
Fabricators generally choose between three approaches, and the right one depends on the countertop material, the sink’s weight, and how much risk the shop is willing to carry during installation.
Three Mounting Approaches
- Epoxy-only: the sink flange bonds directly to the underside of the stone with a structural epoxy, no mechanical hardware. Common on thick, 3 cm slabs with lighter sinks, but there’s no backup if the bond ever fails.
- Clips with epoxy: a stud or bracket is epoxied into the stone, then a clip pulls the flange tight against it. This is the standard approach for granite and quartz, and it gives a mechanical hold in addition to the adhesive bond.
- Screwed clips: flat brackets are screwed directly into wood or laminate from below. No epoxy involved, since adhesive doesn’t bond reliably to wood, and the screws thread into solid material instead.
Epoxy-only mounting saves installation time and avoids visible hardware, and plenty of fabrication shops use it successfully on lighter sinks and thicker stone. The tradeoff is that it puts the entire load on a single adhesive bond with no mechanical redundancy. Clips add that redundancy, holding the sink in position while the epoxy cures and remaining as a permanent anchor afterward, which is the more common choice once a sink’s weight climbs past a standard stainless basin.
By countertop material
The mounting method changes meaningfully depending on what the counter is made of. Stone and engineered quartz bond well with epoxy; wood does not, and needs a completely different fastening approach along with extra attention to sealing the exposed cut edge.
| Material | Mounting method | What to know |
|---|---|---|
| Granite | Epoxied studs or clips | 3 cm slab minimum recommended for undermount cutouts; reinforcement rods add crack resistance |
| Quartz | Epoxied studs or clips | Confirm the epoxy is rated compatible with the manufacturer’s warranty terms before bonding |
| Butcher block / wood | Screwed flat clips, no epoxy | Seal all exposed cut wood with a waterproof finish first; silicone the seam without exception |
| Laminate | Screwed clips | Only with a sink and edge system specifically rated for laminate, not a generic stone-style detail |
A Note on Stone Thickness
According to the Natural Stone Institute’s fabrication standards, undermount cutouts benefit from at least 3 cm slab thickness with embedded reinforcement rods spanning the opening front to back, particularly on 2 cm granite where the inside corners of the cutout are otherwise prone to cracking. This is a voluntary industry standard rather than a building code requirement, but it’s widely followed by fabricators and worth confirming with whoever is cutting the counter.
Wood deserves a separate note, since it’s the material most likely to go wrong quietly. Butcher block and other solid wood counters move with humidity, and any exposed, unsealed wood at the cutout edge will absorb water and eventually warp or rot. Every cut edge needs a waterproof finish before the sink goes in, and the silicone bead at the seam isn’t optional the way it might feel on stone, it’s the main thing standing between the wood and constant moisture.
Step-by-step installation

1
Mark clip spacing
Plan clip locations every 8 to 12 inches around the sink’s rim, a typical rectangular kitchen sink uses around six clips, two per long side and one at each end. Heavier sinks, including solid brass or copper, generally call for spacing at the tighter end of that range or more clips overall.

2
Dry-fit the sink and mark the cutout
Set the sink in position from below without any adhesive, confirm the cutout lines up correctly, and trace clip locations onto the countertop underside before committing to anything permanent.

3
Clean both bonding surfaces
Wipe the countertop underside and the sink flange with denatured alcohol, and let them dry fully. Any dust, oil, or cutting residue left behind will weaken the epoxy bond.

4
Apply epoxy and silicone
On stone or quartz, epoxy the clip studs into the marked positions. On wood, screw the flat clips in instead. Run a continuous bead of silicone along the reveal seam where the countertop edge meets the sink.

5
Clamp and let it cure
Tighten the clips evenly, working around the rim rather than fully tightening one side first, and hold the sink under light clamping pressure while the epoxy cures, typically 24 to 48 hours before the sink should carry any real weight or water.
For a kitchen or bar sink like the solid brass island and outdoor bar sink, the added weight of thick-gauge brass makes even clip spacing and full epoxy cure time worth double-checking before the countertop goes back on the cabinet. The same applies to a wide single-basin piece like the 40 inch farmhouse-style undermount sink, where the long rim benefits from clips spaced at the tighter end of the range along its full length.
Common mistakes
What Goes Wrong Most Often
- Skipping the dry-fit: committing to epoxy before confirming the cutout and clip positions line up leaves no room to adjust once the adhesive sets
- Using epoxy on wood: adhesive rated for stone won’t hold reliably in wood; screws into solid material are the correct fastener there
- Loading the sink before full cure: using the sink, or resting weight on it, before the epoxy reaches full strength, usually 24 to 48 hours, risks the flange separating under load
- Uneven clip tightening: fully tightening one side before starting the others can pull the sink out of alignment or crack a thinner slab at the cutout corner; work in a criss-cross pattern instead, partially tightening opposite clips in turn
- Overtightening the clips: cranking hardware down past snug can crack stone at the corners of the cutout or over-compress the silicone bead before it sets; tighten just enough to close the gap evenly
- Wrong fastener type in stone: concrete screws or wedge-style anchors that expand as they tighten can split granite or quartz from the inside, similar to how stone is split at a quarry; use epoxied studs rated for the specific stone instead
- Skipping the silicone seam: clips hold the sink up, they don’t seal it; water intrusion at an unsealed reveal is one of the more common causes of long-term damage, especially on wood
- Underestimating sink weight: a heavier sink, including solid metal basins, spread across the same clip count and spacing as a lighter stainless sink increases the load on each individual anchor point
Choosing the right basin shape and weight for the countertop and cabinet support is worth deciding before the cutout is cut, not after. The comparison below covers a range of undermount shapes, kitchen, bar, and bathroom, so the clip plan and countertop cutout can be sized to the actual sink from the start.

Kitchen Island / Bar / Outdoor Sink
Square, kitchen or outdoor

Round Hammered Bathroom Sink
Round, bathroom vanity

Bathroom Sink w/ Waterfall Faucet
Curved basin, bathroom

40″ Farmhouse Sink
Rectangular, kitchen

Oval Bathroom Sink
Oval, bathroom

Antique Oval Sink
Oval, drop-in flange

Compact, special-fit setups
Compact Rectangular Sink
The smallest sink in the range, sized for tight bar or prep-sink cutouts rather than a primary kitchen basin. Worth planning clip spacing early given the shorter rim.
The full range, along with sizing and drain options, is on the undermount and drop-in brass sinks collection page. For a wider look at how these compare to drop-in installation, the guide on undermount vs drop-in brass sinks covers the tradeoffs beyond just the clips, and the brass vessel sink guide is the better read if the counter is going vessel-mount instead of undermount.
For the fuller range of undermount and drop-in shapes by sink type, the complete comparison of bathroom sink types breaks down the options beyond just undermount, and for anyone still planning the rough-in itself, bathroom sink plumbing and rough-in dimensions covers the supply line and drain heights worth confirming before the countertop is cut.
Signs the clips are failing
A correctly installed sink shouldn’t need attention for years, but clips and adhesive do eventually loosen, especially on an older installation or one that skipped a step the first time around. Catching it early keeps a cosmetic issue from becoming a water damage problem.
What to Look For
- A visible gap or shadow line at the rim where the sink meets the countertop, even a hairline one
- Stretched, cracked, or missing silicone along the reveal seam
- The sink shifting or feeling loose when leaned on or when a heavy pot is set down
- Water staining or dampness on the cabinet floor directly beneath the sink
- A dripping or clicking sound when the basin fills with water and dishes, a sign the clips are flexing under load
A small, stable gap with intact clips is usually a minor fix, clean out the old silicone, re-bead the seam, and monitor it. A growing gap, loose or snapped clips, or any sign the sink has actually dropped is worth addressing quickly rather than waiting, since the fix from underneath gets harder the longer a sink hangs unevenly. The repair follows largely the same sequence as a new install: support the sink, remove failed hardware and old adhesive, clean both surfaces again, and re-anchor with fresh epoxy or screws and new clips, often adding more anchor points than the original installation used.
Frequently Asked Questions
How do you install undermount sink clips?
Mark clip positions every 8 to 12 inches around the sink rim, dry-fit the sink to confirm the cutout and clip locations, then clean both bonding surfaces with denatured alcohol. Apply epoxy to the stud or clip base on stone, or drive screws into wood, run a bead of silicone along the reveal seam, then clamp the sink in place and let the epoxy cure fully, usually 24 to 48 hours, before loading the sink with weight.
Do undermount sinks need clips?
Most undermount sinks need clips, screws, or a combination of clips and epoxy to carry the sink’s weight long-term, since the sink hangs entirely from the underside of the countertop with no rim resting on top. Some fabricators use epoxy alone on thick, 3 cm stone slabs for lighter sinks, but clips add a mechanical safeguard while the epoxy cures and afterward, and are close to mandatory for a solid metal sink.
Do undermount sink clips work with granite?
Yes, granite is one of the most common surfaces for clip-mounted undermount sinks. Epoxy-bonded studs or clips anchor into the underside of the granite, and the Natural Stone Institute recommends at least 3 cm slab thickness with embedded reinforcement rods spanning the cutout for a secure, long-term hold, particularly under a heavier sink.
What’s the difference between sink clips and epoxy-only mounting?
Epoxy-only mounting relies entirely on an adhesive bond between the sink flange and the underside of the stone, which some fabricators use on thick, 3 cm slabs with lighter sinks. Clips add a mechanical anchor, a stud or bracket epoxied or screwed into the countertop, that physically pulls and holds the sink flange in place while the epoxy cures and as a permanent backup afterward, which matters more as sink weight increases.
How much weight can undermount sink clips hold?
I’m not fully confident in a single universal number, load capacity depends on the clip hardware, the number of clips used, the epoxy or fastener type, and the countertop material, so it varies by manufacturer spec. As a general point of reference, a full sink of water plus a solid brass or copper basin can weigh considerably more than a standard stainless steel sink, which is why heavier sinks typically call for more clips, spaced closer together, rather than relying on fewer anchor points.
How do I know if my undermount sink clips have failed?
The most common signs are a visible gap or shadow line between the sink rim and the countertop, a stretched or cracked silicone bead, the sink shifting or feeling loose when leaned on, or water staining on the cabinet floor beneath it. Any of these mean the clips or adhesive bond have loosened or failed and the sink needs to be re-secured before the gap grows or water damage sets in.
Planning an undermount installation with a solid brass or copper sink? Browse the Insideast undermount and drop-in collection, handmade in Marrakech in a range of shapes for kitchens, bars, and bathrooms.